Computer Graphics and Multimedia Software - Knowledge Sharing

Tuesday, December 21, 2010

Using ARToolkit to develop Augmented Reality

There are two parts to developing Augmented Reality applications that use ARToolKit; writing the application, and training image-processing routines on the real world markers that will be used in the application.

Developing the application

In writing an ARToolKit application the following steps must be taken:

1. Initialize the video path and read in the marker pattern files and camera parameters.
2. Grab a video input frame.
3. Detect the markers and recognized patterns in the video input frame.
4. Calculate the camera transformation relative to the detected patterns.
5. Draw the virtual objects on the detected patterns.
6. Close the video path down.

Steps 2 through 5 are repeated continuously until the application quits, while steps 1 and 6 are just performed on initialization and shutdown of the application respectively. In addition to these steps the application may need to respond to mouse, keyboard or other application specific events.

To show in detail how to develop an application we will step through the source code for the simpleTest program. This is found in the directory examples/simple/ The file we will be looking at is simpleTest.c. This program simply consists of a main routine and several graphics drawing routines. The main routine is shown below:


int main (int argc, char **argv)
{

glutInit (&argc, argv);
init();
arVideoCapStart();
argMainLoop (NULL, keyEvent, mainLoop);
return (0);

}

This routine calls an init initialization routine that contains code for initialization of the video path, reading in the marker and camera parameters and setup of the graphics window. This corresponds to step 1 above.

Next, the function arVideoCapStart() starts video image capture.
Finally, the argMainLoop function is called which starts the main program loop and associates the function keyEvent with any keyboard events and mainLoop with the main graphics rendering loop. The definition of argMainLoop is contained in the file gsub.c that can be found in the directory lib/Src/Gl/

In simpleTest.c the functions which correspond to the six application steps above. The functions corresponding to steps 2 through 5 are called within the mainLoop function.

Recognizing different patterns

The simpleTest program uses template matching to recognize the different patterns inside the marker squares. Squares in the video input stream are matched against pre-trained patterns.

These patterns are loaded at run time and are contained in the Data directory of the bin directory. In this directory, the text file object_data specifies which marker objects are to be recognized and the patterns associated with each object. The object_data file begins with the number of objects to be specified and then a text data structure for each object. Each of
the markers in the object_data file are specified by the following structure:

Name
Pattern Recognition File Name
Width of tracking marker

For example the structure corresponding to the marker with the virtual cube is:

#pattern 1
cone
Data/hiroPatt
80.0

Note that lines beginning with a # character are comment lines and are ignored by the file reader. In order to change the patterns that are recognized the sampPatt1 filename must be replaced with a different template file name.

These template files are simply a set of sample images of the desired pattern. The program to create these template files is called mk_patt and is contained in the bindirectory. The source code for mk_patt is in the mk_patt.c file in the util directory.


ARToolkit tutorial for beginersDownload latest version ARToolkit 2.7.2.1
Rujuk Documentation provided in HitLab website for more information/additional note.
Must know how to configure and setting up ARToolkit – set directories “Option properties” visual studio pada linker, include dll, path.

Download Tutorial 1 (.pdf)

Download Tutorial 2 (.pdf)


Share:

Tuesday, December 14, 2010

How to import VRML model in ARToolkit

Each pattern is associated with an image.
The mapping between pattern and image is found in
C:\ARToolkit\bin\data\vrml_data for simpleVRML.exe program
and C:\ARToolkit\bin\data\multi_vrml_data for the multiVRML.exe program.


For the simpleVRML.exe program, the patterns to be recognized and their associated models are specified in the Data/vrml_data file. In this file you will see a set of lines like this:

#pattern 1
VRML Wrl/bud_B.dat
Data/patt.hiro
80.0 0.0 0.0

In order to import your own model you will have to follow this pattern (Using your_file as example name):

1. Copy your_file.wrl into the Wrl directory

2. Make a your_file.dat file and associate it with your_file.wrl by typing Wrl/ your_file.wrl on the first line. (You may take a copy of one the existing .dat files and edit it to fit your wrl file). Place it in the Wrl directory.

3. Make a new marker (Se section 3.2) or use one that is not yet in use.

4. Edit the Data/vrml_data file by adding a new paragraph:
#pattern 3
VRML Wrl/ your_file.dat
Data/patt.sample1 -- Alternatively your new marker (See on How to make your own marker) 80.0
0.0 0.0

Start the simpleVRML.exe program. When the camera recognizes the pattern associated with your model, the model will be loaded and rendered.


Share:

How to generate marker

Marker


In order to create your own markers you have to start with a new blank rectangle. To make it simple you can use the blankPatt.gif (Picture 5) located in the patterns folder of the ARToolKit installation.

The next thing you have to do is start the mk_patt.exe file located in the bin folder. The file requires an input for the camera. You can use "data/camera_para.dat". This is the default setting for the camera.

Position the camera right over the marker. You should be able to see a red and green square around the pattern. This means that ARToolKit has found your marker. Rotate the camera until the red corner is in the upper left (Picture 7).

How to create Marker Using ARToolkit

In order to capture the marker, we must run an executable that is included in the software library. Make sure your camera is plugged in!

1. The file, mk_patt.exe, can be located in the ARToolKit\bin directory


2. Double click the mk_patt.exe, screen below will appear.


3. Attach the camera to detect your pattern of marker.


4. Enter your pattern name. For example patt.aku


5. Press Enter to saved the pattern.


6. Once you have created the pattern file using the mk_patt executable, copy the pattern file into the ARToolKit\bin\Data directory. This is important as the pattern files are accessed in this directory.


7. Once the pattern file has been copied, you will then need to edit the object_data_vrml file in the ARToolKit\bin\Data directory. Right click the object_data_vrml file and open it in WordPad.


8. The file required . dat file. Next you will learn how to create .dat file


How to create file .dat

Once you have the file in this directory, you will need to create a .dat file that is required from the toolkit. To create the .dat file, right click any empty space in the ARToolKit\bin\Wrl directory. Select New Text Document when the menu appears. Rename this document file to nameOfModel.dat. In our example, we have named it pasu.dat


In the .dat file you will specify the model file and the translation, rotation, and scale parameters.


Using your favourite 3D modelling program, export the model or animation into a .WRL file. If you are using any textures for your model, have the path of the texture set to “./textures/nameOfTexture.gif”. One thing to note is that ARToolKit only supports .GIF formats. Make sure your texture file is in gif format before you export the model!
Once you have the 3D model exported, copy it into the ARToolKit\bin\Wrl directory.

Model yang support
- Obj
- WRL // untuk VRML
Convert your model kepada WRL atau OBJ jika model itu format .3ds, .stl, .max, .dxf and so on

Save this file and run the SimpleVRML executable. Your model should now display on your
custom marker!

Share:

XNA Programming and XNAGoblin

Installing XNA

This beta also does not include the additional starter kits and tutorials which will be made available upon final release of XNA Game Studio Express and/or as part of your XNA Creators Club subscription

Instructions

- Install Microsoft Visual C# 2005 Express Edition using the link below.
- Download and run the Microsoft XNA Game Studio Express Beta 2 installer.
- Follow the instructions displayed during setup.
- Launch Microsoft XNA Game Studio Express from the Start Menu.

Requirements:

- Supported Operating Systems: Windows XP Service Pack 2
Only supported on Microsoft Windows XP SP2 (all editions) at this time. Windows Vista support will be available in an update to version 1 next year.
- Hardware requirements are identical to those for Visual Studio 2005 plus a graphics card that supports DirectX 9.0c and Shader Model 1.1 (Shader Model 2.0 is recommended and required for some Starter Kits).
- This release requires Microsoft Visual C# 2005 Express Edition to be installed before proceeding. You can install Visual C# Express from the Visual C# Express Download Page. Visual C# Express and XNA Game Studio Express can co-exist on the same computer with other members of the Visual Studio 2005 line of products, for example Visual Studio 2005 Professional.


Augmented Reality Shooting Game in XNAGoblin


Share:

Camera Calibration for AR


Using ALVAR

Here’s system environment :
• Windows XP (SP2)
• Visual Studio 2008 Professional
XNA 3.1
• Logitech QuickCam Pro 9000

Configuring Environment Variable :

Click Start > Left Click My Computer > Properties >Advanced System Settings
in the Advanced Tab, choose “Environment Variables…”

In System variables part, choose Path variable, make sure paths below listed :
C:\Program Files\Alvar 1.3.0\bin\msvc90
C:\Windows\System32
C:\Program Files\OpenCV\bin


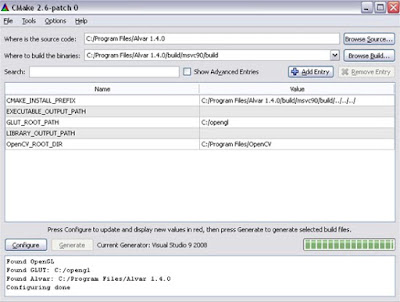
Generating ALVAR Visual Studio Solution (.sln):

open your command prompt and type
cd “Program Files\Alvar 1.3.0\build\msvc90″
generate.bat

CMake window will appear :


for variable GLUT_ROOT_PATH fill with C:/Program Files/glut-3.7.6-bin
Press “Configure”, if there is no error press “Generate
If Success, Alvar.sln will appear in C:\Program Files\Alvar 1.3.0\build\msvc90\build

Running SampleCamCalib :

Confirm that your webcam in good condition and ready to use
SampleCamCalib window will appearing
Not to forget to print chess pattern in C:\Program Files\Alvar 1.3.0\doc\Alvar.pdf
Share:

Friday, November 26, 2010

Augmented Reality Using Google Sketch-UP

Google Sketch-UP


ARMedia with Google Sketch-UP

ARMedia plugin for Google Sketch-UP

A few Demos :

Share:

Augmented Reality Applications with VRML support


Introduction to ARTOOLKIT
ARToolKit is a software library for building Augmented Reality (AR) applications....
more...

Read Documentation  more...

Creating your own Augmented Reality application - I will provide AR tutorial soon....

  
Installation 

ARToolkit 2.70 with VRML support

The latest version is available from http://sourceforge.net/projects/artoolkit and includes the following files:

ARToolkit-2.70.tgz Platform independent
DsVideoLib-0.0.4-win32.zip i386
OpenVRML-0.14.3-win32.zip i386

The ARToolKit is a collection of libraries, utilities applications, and documentation and sample code. The libraries provide the user with a means to capture images from video sources, process those images to optically track markers in the images, and to allow compositing of computer-generated content with the real-world images and display the result using OpenGL (Phillip Lamb, 2004). ARToolKit is designed to build on Windows, Linux, SGI Irix, andMacintosh OS X platforms.

Hardware

* Camera (your webcam)
* Marker (Pattern need to register your 3D object (.vrml) to be rendered for 3D augmentation)


Building on Windows
(Read the full release notes on Sourceforge for other platforms)

Prerequisites:

* Microsoft Visual Studio .NET 2003 , Visual Studio 6 (Also Microsoft Visual Studio 2005, Microsoft Visual Studio 2008)
* DSVideoLib-0.0.4-win32. Download from http://sf.net/projects/artoolkit
* GLUT. Download from http://www.opengl.org/resources/libraries/glut.html
* DirectX 9.0b or later SDK. If you are using VS6, you must use 9.0b as DirectX 9.0c no longer includes support for VS6. Download from http://msdn.microsoft.com/library/default.asp?url=/downloads/list/directx.asp
* (DirectX 9.0c October 2004 or later only) DirectX SDK Extras package. Once downloaded and unzipped, move the "Samples" folder into the top-level of the installed SDK path.
* (Optional, for VRML renderer only) OpenVRML-0.14.3-win32. Download fromhttp://sf.net/projects/artoolkit.

Build steps:

1. Unpack the ARToolKit zip to a convenient location. This location will be referred to below as {ARToolKit}.
2. Unpack the DSVideoLib zip into {ARToolKit}.
3. Copy the files DSVideoLib.dll and DSVideoLibd.dll from{ARToolKit}\DSVideoLib\bin.vc70 into {ARToolKit}\bin.
4. Run the script {ARToolKit}\DSVideoLib\bin.vc70\register_filter.bat.
5. Install the GLUT DLL into the Windows System32 folder, and the library and headers into the VS platform SDK folders.
6. Run the script {ARToolKit}\Configure.win32.bat to create include/AR/config.h.
7. Open the ARToolKit.sln file (VS.NET) or ARToolkit.dsw file (VS6).
8. Open the Visual Studio search paths settings(Tools->Options->Directories for VS6, or Tools->Options->Projects->VC++Directories for VS.NET) and add the DirectX SDK Includes\ path and theDirectX Samples\C++\DirectShow\BaseClasses\ path to the top of the search path for headers, and the DirectX SDK Lib\ path to the top of thesearch path for libraries.
9. (Optional, only if rebuilding DSVideoLib). Build the DirectShow baseclasses strmbase.lib and strmbasd.lib. (More information can be found atThomas Pintarics homepage for DSVideoLib(http://www.ims.tuwien.ac.at/~thomas/dsvideolib.php)).
10. Build the toolkit.The VRML renderering library and example (libARvrml & simpleVRML) are optional builds:
11. Unpack the OpenVRML zip into {ARToolKit}.
12. Copy js32.dll from {ARToolKit}\OpenVRML\bin into {ARToolKit}\bin.
13. Enable the libARvrml and simpleVRML projects in the VS configuration manager and build.

 Screenshot

 Debug folder: 


Share:

Augmented Reality for Mobile-Based using Unity3D, Vuforia and Arduino

Part 1 : Augmented Reality tutorial Arduino 

Download # Unity3D (download and install it) (*.exe file)
Unity3D is also available to download from here
Download # Download and Import Unity3D Extension (*.unitypackage file)
Unity3D extension is also available to download from here
Download # Download and Import EdgarasArt tracker in Unity3D  (*.unitypackage file)
You can create your own tracker here
Download # Print this image to augment the content  (*.jpg file)


Part 2 : Augmented Reality tutorial Arduino 

Part 1 of the project available here
Download # Image of flames  (*.jpg file)
Download # Print this image to augment the content  (*.jpg file)
Download # Final result of this project  (*.rar file)

Mobile Augmented Reality

Share:

Augmented Reality Categories

Optical See-Through HMD

One of the devices used to merge real and virtual environment is an Optical See-Through HMD. It allows the user to interact with real world using optical technologies to superimpose virtual objects on the real world, as stated by Azuma (1997) and agreed by Ajune et al (2008).  The optical see-through is used transparent HMD to produce the virtual environment directly to the real world. Optical see-through HMDs’ function is placing optical combiners in front of the user's eyes. 


Video See Through

Again, as mentioned by Azuma (1997), Video see-through HMDs are able to give user a real world sight by combining a closed-view HMD with one or two head-mounted video cameras, due to this mixture give user a view of real world and virtual world in real-time through the monitors in front of the user's eyes in the closed-view HMD. Figure 2.4 shows a conceptual diagram of a video see-through HMD. Figure 2.5 shows a video see-through HMD. Video composition can be done using chroma-key or depth mapping (Silva, Oliveira & Giraldi 2003)

Virtual Retinal Systems

Virtual Retinal Systems aim to produce a full color, wide field-of-view, high resolution, high brightness and low cost virtual display (Ishii, 1994). This technology can be used in wide range of applications from head-mounted displays for military or aerospace applications to medical purposes. The Virtual Retinal Display (VRD) uses a modulated beam of light (from an electronic source) directly onto the retina to produce a rasterized image, as stated by Azuma (1997). 

Monitor Based AR

Monitor based AR uses one or two video cameras to view the environment where the cameras may be static or mobile. The video was produced by combining the video of the real world and graphic image generated by a scene generator and the product was shown to user by using monitor device. The display devices are not wearing by the user but when the images are presenting in the stereo on the monitor, it requires user to wear the display devices such as stereo glasses. 


Recently, AR is widely being used in many applications such as education, entertainment, simulation and games. In virtual heritage, AR is used to enhance the overall experience of the visitor of a cultural heritage site. Furthermore, with the interactive, realistic and complex AR system, it can enhance, motivate and stimulate students’ understanding of certain events
Share:

Augmented Reality XNAGoblin using ALVAR

Toolkit for Augmented Reality Games development using XNA

Goblin XNA is a platform for research on 3D user interfaces, including mobile augmented reality and virtual reality, with an emphasis on games. Need to setting up your computer should have the specification : Windows XP, Vista, or 7 Requirements for running XNA Game Studio 3.1.
It is written in C# and based on Microsoft XNA Game Studio 3.1. XNAGoblin details


Goblin XNA http://graphics.cs.columbia.edu/projects/goblin/ uses a scene graph to support 3D scene manipulation and rendering, mixing real and virtual imagery. 6DOF (six-degrees-of-freedom) position and orientation tracking is accomplished using the ALVAR or ARTag marker-based camera tracking package with DirectShow or PGRFly (for Point Grey cameras), and InterSense hybrid trackers. In addition to regular desktop and hand-held computer displays, Goblin XNA also supports the Vuzix iWear VR920 head-worn display in monoscopic and stereoscopic modes, along with its 3DOF orientation tracker. Physics is supported through the Newton Game Dynamics library, and networking through the Lidgren library. Goblin XNA also includes a 2D GUI system to allow the creation of classical 2D interaction components.

Installation XNA 


XNA is a very cool initiative from Microsoft that takes away the need for a lot of the low level coding normally required in the creation of a computer game. This is achieved by a set of libraries, tools and use of the C# programming language.

Below some of the concepts and series of basic knowledge on XNA Programming :

Develop 2D games :

# Installing XNA and opening your first XNA project
# Rendering 2D images to the screen
# Scaling, rotating and positioning 2D images
# Keyboard input
# Playing sound effects in XNA
# Per-pixel texture manipulations
# Random terrain slope generation
# Alpha blending
# Collision detection (the most complex case is covered: per-pixel transformed)
# And even a complete 2D particle engine for the explosions!

Develop 3D games:

# Starting a project: setting up and using the Development Environment
# The effect file: effects are needed to draw stuff on the screen
# The first triangle: defining points, displaying them using XNA
# World space: defining points in 3D space, defining camera position
# Rotation & translation: rotating and moving the scene
# Keyboard: read user input on the keyboard using XNA
# Load 3D models, adding colors, textures
# Lighting basics: lighting can be complex to fully understand, a whole chapter on this subject


Are games really written using XNA?

The main target for XNA is hobbyists and for people learning to write games. Since it uses C# (a managed language that requires a runtime environment) it runs a lot slower than equivalent C++ code (that compiles down to machine level code) so commercial PC and Xbox 360 games are typically written in C++. Having said this with the release of XNA 3.0 Microsoft have created a means of releasing your own game written using XNA online (via Xbox Live) and obtaining royalties for it (set at 70%). How profitable this is remains to be seen.

How do you get started with XNA?

To create XNA games for the PC is completely free. You just need to download the XNA Game Studio from Microsoft and you can use it with the free version of Visual Studio C# Express. If you already own the commercial Visual Studio 2008 that can (and should) be used instead as it adds more features.

The software required to start writing your own XNA code is completely free:

Microsoft XNA Game Studio 2.0, the programming environment
Microsoft Visual Studio C# Express (link, make sure you select the C# edition, marked in green). XNA Game Studio 2.0 will also work with the full version of Visual Studio 2005.

Why is it cool?

XNA takes away a lot of the pain of working with the graphics, input etc. on a PC, Xbox or Zune. It implements the .NET framework and comes with a number of tools for game creation. It supports graphics via managed Direct3D and the Xbox 360 controller (for Xbox or PC). It supports sound and includes a content creation tool for sound developers. From version 3.0 it includes multi player support. C# itself is a very nice language to program for.
Share:

Augmented Reality Using Flash

Augmented reality (AR) is a field of computer graphic that virtual entities are overlaying superimposing in our real world. It was real-time and an interactive, three-dimensional virtual world. AR now enable to the browser for web-based by using embedding ability of Flash for AR. Then now how to apply this exciting technology? There are using Adobe Flash CS4 Professional ported Action Script 3.0, Adobe Flash Player 10, and a webcam.

Development toolkit available for AR using flash is # Flash Augmented Reality code library (FLARToolkit)

FLARToolKit is free to use for non-commercial applications under the GPL license. This means the complete source code for your application must be made available to anyone that asks for it. FLARToolKit is based on the ARToolKit library under the GPL license and so the source code for any FLARToolKit applications that are made needs to be GPL as well.

I do have the live demo here :
LIVE DEMO


Share:

Tuesday, May 25, 2010

SixthSense Augmented Reality Technology

The thrilling potential of SixthSense technology (MUST WATCH)


* About Pranav Mistry

* Personal page Pranav Mistry , is the inventor of SixthSense, a wearable device that enables new interactions between the real world and the world of data.

* Awards :

  • - Won Technology Review TR35 2009 Young Inventor Award
  • - Winner of 'Young Indian Innovator 2009' award
  • - Sixth Sense has been awarded 2009 Invention Award by Popular Science
Project Natal For XBOX360


About Project Natal
Share:

Technology our SLAVE??

Technology is advancing as the lightning speed. As we all know that if one new technology has been invented for a particular advantage it brings with it lot more disadvantages.

Robots , mobile , computer and much more such technology is becoming more powerful than dynamite.They r proving to b very much hazardous to human health as well as the behaviour of the person. Also the lifestyle has been totally changed.

Mobile will be given tag as "tumour causing". The communication through it takes place in GHz which passes from the side of our brains if we talk w/o headphones. The person who has the habit of talking hours with frnds w/o headphones are predicted to b affected by tumour or some cancer in one or two decades.

Robots have been so advanced that we dont understand that are they our slaves or we are their slaves.

What do u think, Technology or Mankind, who is SLAVE?

Share:

Malaysia Augmented Reality

Its incredibly difficult to discover the undiscovered. Here will see how I can help you. Cheers - Ajune (comp.utm.my/ajune)
ajune@utm.my. Powered by Blogger.